如何使用 Nano Banana 进行构建:完整的开发者教程
Google 最近发布了 Gemini 2.5 Flash Image,这是一个功能强大的图像生成和编辑新模型,其代号为 Nano Banana。该模型引入了最先进的图像创建和操作功能,解锁了广泛的新应用。 本指南为希望使用 Gemini Developer API 将 Gemini 2.5 Flash Image(又名 Nano Banana)集成到其应用程序中的开发者提供了全面的分步说明。


Google 最近发布了 Gemini 2.5 Flash Image,这是一个功能强大的图像生成和编辑新模型,其代号为 Nano Banana。该模型引入了最先进的图像创建和操作功能,解锁了广泛的新应用。
本指南为希望使用 Gemini Developer API 将 Gemini 2.5 Flash Image(又名 Nano Banana)集成到其应用程序中的开发者提供了全面的分步说明。
本指南将涵盖:
- 在 AI Studio 中使用 Nano Banana
- 项目设置
- 图像创建
- 图像编辑
- 照片修复
- 多输入图像
- 对话式图像编辑
- 最佳实践和有效提示
- 社区示例和灵感
- 资源
以下是您将在本教程中构建的示例:
prompt = "Restore and colorize this image from 1932"

response = client.models.generate_content(
    model="gemini-2.5-flash-image-preview",
    contents=[prompt, image],
)
让我们开始吧!
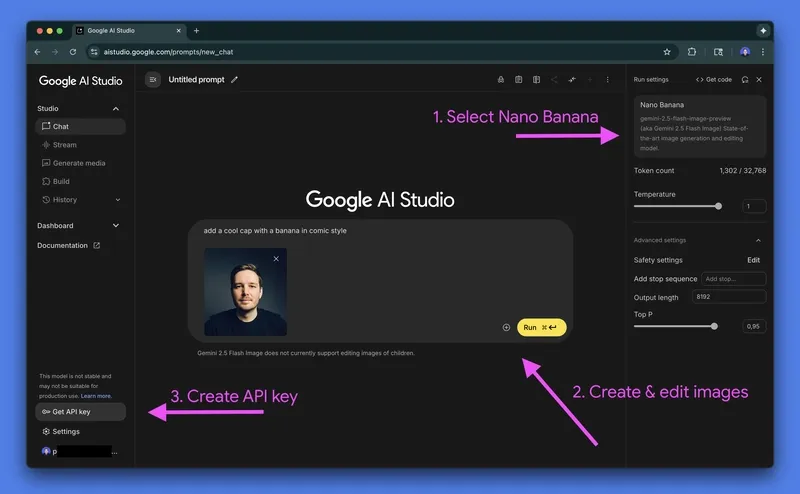
1) 在 Google AI Studio 中使用 Nano Banana
虽然最终用户可以在 Gemini 应用 中访问 Nano Banana,但开发者原型设计和测试提示的最佳环境是 Google AI Studio。AI Studio 是一个用于在编写任何代码之前试验所有可用 AI 模型的游乐场,它也是使用 Gemini API 进行构建的入口点。
您可以在 AI Studio 中免费使用 Nano Banana。要开始使用,请访问 aistudio.google.com,使用您的 Google 帐户登录,然后从模型选择器中选择 Nano Banana。
如需直接访问,请使用此链接启动与模型的会话:ai.studio/banana
提示:您还可以在 AI Studio 的 ai.studio/apps 中直接编写 Nano Banana Web 应用程序,或者探索代码并重新混合 现有应用程序 之一。
2) 项目设置
要遵循本指南,您需要以下内容:
- 来自 Google AI Studio 的 API 密钥。
- 为您的项目设置的结算。
- 适用于 Python 或 JavaScript/TypeScript 的 Google Gen AI SDK。
步骤 A:生成 API 密钥
请按照以下步骤操作:
- 在 Google AI Studio 中,单击左侧导航面板中的 获取 API 密钥。
- 在下一页上,单击 创建 API 密钥。
- 选择现有 Google Cloud 项目或创建新项目。此项目用于管理 API 使用的结算。
完成此过程后,将显示您的 API 密钥。复制并安全存储它。
步骤 B:启用结算
虽然在 AI Studio 中进行原型设计是免费的,但通过 API 使用模型是一项付费服务。您必须在 Google Cloud 项目中启用结算。
在 API 密钥管理屏幕中,单击项目旁边的 设置结算,然后按照屏幕上的说明进行操作。

Nano Banana 的费用是多少?
使用 Nano Banana 生成图像的费用为每张图像 0.039 美元 *。1 美元大约可以生成 25 张图像。
* 官方定价为每 1M 输入令牌 0.30 美元,每 1M 输出令牌 30 美元。一张标准的 1024x1024 像素输出图像消耗 1290 个令牌,相当于每张图像 0.039 美元。有关详细信息,请参阅 Gemini 2.5 Flash Image 定价表。
步骤 C:安装 SDK
选择您首选语言的 SDK。
Python:
pip install -U google-genai
# Install the Pillow library for image manipulation
pip install Pillow
进入全屏模式 退出全屏模式
JavaScript / TypeScript:
npm install @google/genai
进入全屏模式 退出全屏模式
以下示例使用 Python SDK 进行演示。此 GitHub Gist 中提供了 在 JavaScript 中使用 Nano Banana 的等效代码片段。
3) 从文本生成图像
使用 Nano Banana 从描述性文本提示生成一张或多张图像。所有 API 请求都使用模型 ID gemini-2.5-flash-image-preview。
from google import genai
from PIL import Image
from io import BytesIO

# Configure the client with your API key
client = genai.Client(api_key="YOUR_API_KEY")

prompt = """Create a photorealistic image of an orange cat
with a green eyes, sitting on a couch."""

# Call the API to generate content
response = client.models.generate_content(
    model="gemini-2.5-flash-image-preview",
    contents=prompt,
)

# The response can contain both text and image data.
# Iterate through the parts to find and save the image.
for part in response.candidates[0].content.parts:
    if part.text is not None:
        print(part.text)
    elif part.inline_data is not None:
        image = Image.open(BytesIO(part.inline_data.data))
        image.save("cat.png")
输出:

该模型是多模态的,因此响应被构造为 parts 列表,其中可以包含交错的文本和图像数据 (inline_data)。上面的代码遍历这些部分以提取和保存生成的图像。
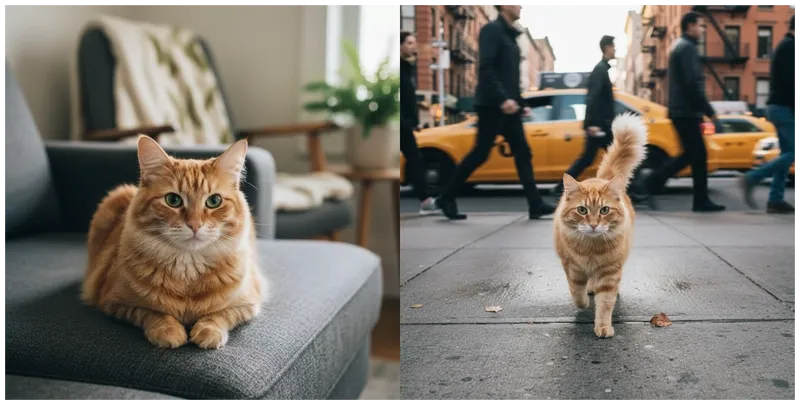
4) 使用文本和图像输入进行图像编辑
提供现有图像以及文本提示以执行编辑。该模型擅长保持输入图像的特征和内容一致性。
from google import genai
from PIL import Image
from io import BytesIO

client = genai.Client(api_key="YOUR_API_KEY")

prompt = """Using the image of the cat, create a photorealistic,
street-level view of the cat walking along a sidewalk in a
New York City neighborhood, with the blurred legs of pedestrians
and yellow cabs passing by in the background."""

image = Image.open("cat.png")

# Pass both the text prompt and the image in the 'contents' list
response = client.models.generate_content(
    model="gemini-2.5-flash-image-preview",
    contents=[prompt, image],
)

for part in response.candidates[0].content.parts:
    if part.text is not None:
        print(part.text)
    elif part.inline_data is not None:
        image = Image.open(BytesIO(part.inline_data.data))
        image.save("cat2.png")
输入和输出:
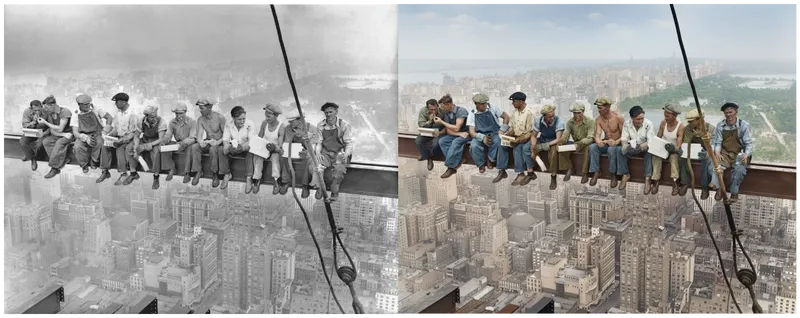
5) 使用 Nano Banana 进行照片修复
该模型强大的应用之一是照片修复。通过简单的提示,它可以修复旧照片并为其上色,效果令人印象深刻。
from google import genai
from PIL import Image
from io import BytesIO

client = genai.Client(api_key="YOUR_API_KEY")

prompt = "Restore and colorize this image from 1932"

image = Image.open("lunch.jpg")  # "Lunch atop a Skyscraper, 1932"

response = client.models.generate_content(
    model="gemini-2.5-flash-image-preview",
    contents=[prompt, image],
)

for part in response.candidates[0].content.parts:
    if part.text is not None:
        print(part.text)
    elif part.inline_data is not None:
        image = Image.open(BytesIO(part.inline_data.data))
        image.save("lunch-restored.png")
原始和输出:

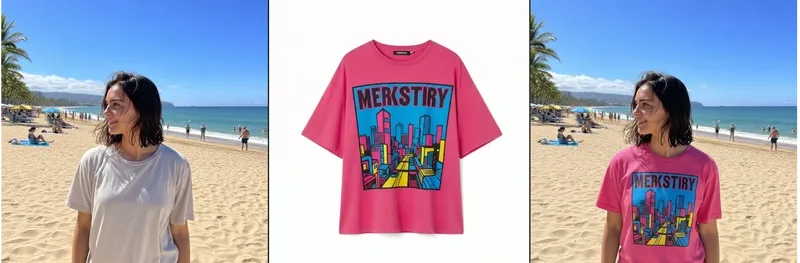
6) 使用多个输入图像
您可以提供多个图像作为输入,以执行更复杂的编辑任务。
from google import genai
from PIL import Image
from io import BytesIO

client = genai.Client(api_key="YOUR_API_KEY")

prompt = "Make the girl wear this t-shirt. Leave the background unchanged."

image1 = Image.open("girl.png")
image2 = Image.open("tshirt.png")

response = client.models.generate_content(
    model="gemini-2.5-flash-image-preview",
    contents=[prompt, image1, image2],
)

for part in response.candidates[0].content.parts:
    if part.text is not None:
        print(part.text)
    elif part.inline_data is not None:
        image = Image.open(BytesIO(part.inline_data.data))
        image.save("girl-with-tshirt.png")
输入和输出:
7) 对话式图像编辑
Nano Banana 可以通过多轮对话进行图像编辑,从而实现更精细的控制和迭代。
from google import genai
from PIL import Image
from io import BytesIO

client = genai.Client(api_key="YOUR_API_KEY")

# Start a chat session
chat = client.models.start_chat(
    model="gemini-2.5-flash-image-preview",
    history=[]
)

# First turn: provide an image and a prompt
image1 = Image.open("cat.png")
response = chat.send_message([
    "Change the cat's eyes to blue.",
    image1
])

for part in response.candidates[0].content.parts:
    if part.text is not None:
        print(part.text)
    elif part.inline_data is not None:
        image = Image.open(BytesIO(part.inline_data.data))
        image.save("cat-blue-eyes.png")

# Second turn: refine the image further
image2 = Image.open("cat-blue-eyes.png")
response = chat.send_message([
    "Now make the cat wear a tiny party hat.",
    image2
])

for part in response.candidates[0].content.parts:
    if part.text is not None:
        print(part.text)
    elif part.inline_data is not None:
        image = Image.open(BytesIO(part.inline_data.data))
        image.save("cat-party-hat.png")

8) 最佳实践和有效提示
要充分利用 Nano Banana,请遵循以下提示工程最佳实践:
- 具体且详细:提供清晰、具体的描述。例如,不要只说“一只狗”,而是说“一只金毛猎犬在阳光明媚的公园里追逐飞盘,背景是模糊的绿色草地和树木”。
- 使用负面提示:指定您不希望在图像中看到的内容。例如,“没有模糊,没有水印,没有文字”。
- 指定风格和情绪:使用形容词来传达所需的艺术风格(例如,“赛博朋克”、“水彩”、“超现实主义”)和情绪(例如,“宁静”、“充满活力”、“神秘”)。
- 提供参考图像:对于风格或构图,提供参考图像可以显著提高结果的准确性。
- 迭代和完善:从简单的提示开始,然后逐步添加细节和约束,直到达到所需的结果。
9) 社区示例和灵感
探索社区使用 Nano Banana 创建的令人惊叹的示例:
10) 资源
希望本教程能帮助您开始使用 Nano Banana 构建令人惊叹的图像应用程序!如果您有任何问题或反馈,请在评论中告诉我们。
原文链接:https://dev.to/googleai/how-to-build-with-nano-banana-complete-developer-tutorial-646